14- Select frame 1 on both layers and goto Properties Panel and set easing to 100 ( see Screen 5-5 ), easing makes the zoom-in and out effect look smooth. Repeat this step with frame 15 on both layers.
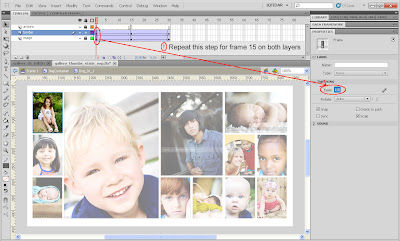 Screen 5-5. Click or Right-click on image for high-res shot or righ-click open in new tab to download.
15- Now on frame 15, we will make both the thumbnail image and the square border increase in size to show a Zoom-In effect. 1st selct frame 15 on the Image layer and increase the width to by 14 pixels, in this example the image's original width is 96 px, so we make the width to 110 pixels, and on the properties bar if you link both Width & Height (
see Screen 5-6) the size of the image or object will increase in proportion or we can say the ratio of width and height will be maintained.
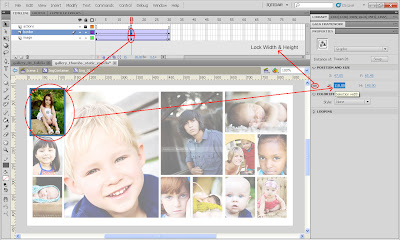 Screen 5-6. Click or Right-click on image for high-res shot or righ-click open in new tab to download.
16- Now you have to repeat this procedure for every Movie Clip on the stage. After that we will move to the part where we will make these Movie Clips respond to the movement of our mouse.
Step 6: Applying ActionScript for Roll-Over effect.
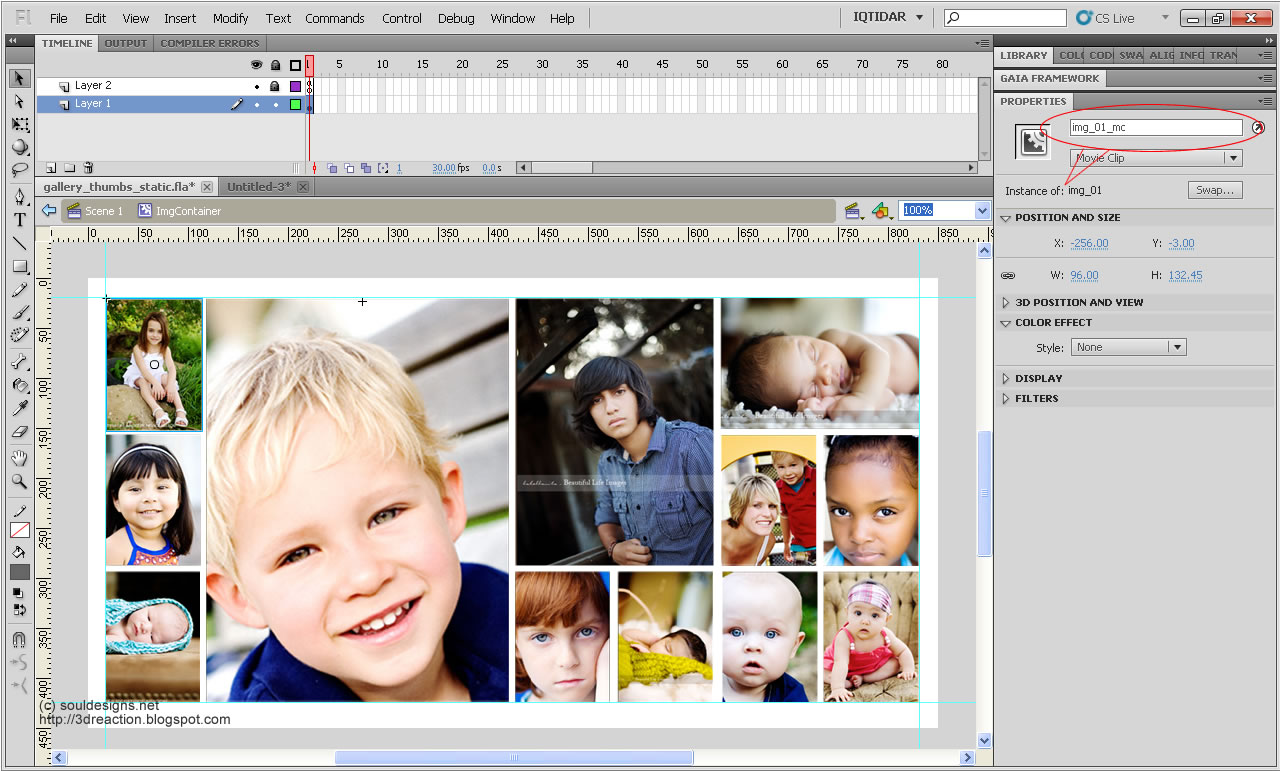
As we know by now that we have created movie clips on the stage and have given them
Instance Names i.e.
img_01_mc,
img_02_mc, so on and so forth. These instance names are like identifiers and are used to communicate with the display objects (Movie Clips, Buttons etc.)
Step by step we will define how to progress towards the goal. All of the actionscript will be put on the Image_Container movie clip's first frame;
(see Screen 6-0)
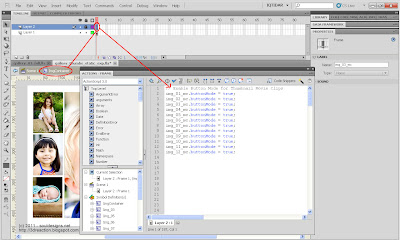 Screen 6-0. Click or Right-click on image for high-res shot or righ-click open in new tab to download.
1- We need our movie clips to respond like buttons, to show hand-cursor on Roll Over and Later on make them click-able.
img_01_mc.buttonMode = true;
in this simple line we have given our movie clip instance "img_01_mc" the attribute of a button, now this movie clip will act as a button to the mouse, means when we take our mouse over this movie clip, the hand-cursor will appear like it appears on buttons. We need to add this piece of code for every movie clip in the actions panel.
(see Screen 6-0)
2- We are now ready to start our first roll-over;. We need to add an
"Event Listener" to the code; an Event Listener in AS 3 is like a radar in my opinion, it just keeps waiting for an event which will or may occur in the lifetime of the movie clip.
img_01_mc.addEventListener(MouseEvent.ROLL_OVER, rollOverMC1);
in the above line of code we are adding an Event Listener to our
img_01_mc movie clip, this event listener keeps waiting for the event when the mouse rolls over this movie clip / button, and when the mouse comes over this movie clip, it triggers the function called
"rollOverMC1"
we also need to add an event Listener when the mouse Rolls Out of the movie clip, because when the mouse rolls out, we want our clip to zoom back or zoom-out back to it's normal position.
img_01_mc.addEventListener(MouseEvent.ROLL_OUT, rollOutMC1);
it's the same event listener as above, just the difference is that, it listens to when the mouse rolls out and triggers a different function which is called
"rollOutMC1"
Now we will create the functions which will command our movie clip "
function rollOverMC1 (event:MouseEvent):void {
img_01_mc.gotoAndPlay(2);
setChildIndex(img_01_mc, numChildren-1);
}
ok, now's the time to explain this function; we can see that first this function is triggerd on a MousEvent and it takes our
"img_01_mc" to go and play it's 2nd frame, because by default our movie clip is stopped at frame 1 and when mouse rolls over it starts playing from frame 2 and stops at frame 15 because we have put an
stop(); function there already, now till when the mouse is over our movie clip it's going to be at frame 15, at this frame if you remember we had made the size of our objects increase, right? so when it moves from frame 2 to 15 we'll get an effect of the image zooming in. and when our mouse rolls out of the movie clip we will trigger another function, but before that we need to explain what
setChildIndex means and what it's doing;
Child Index:
On the main stage we have a mother movie clip named
Image_Container, right? whatever name you have given is the main or mother movie clip or you can also call it parent, because it contains several more movie clips in it, which are our Button Movie clips
img_01_mc, img_02_mc etc. etc.
The several movie clips inside the parent movie clip are it's children, automatically some clips are over others and some are under others like layers, if we count the number of these movie clips in our case, we have 12 movie clips and flash automatically keeps the record of all of these as the children and creates an
index(number counting) to understand which clip is over another or which child is the eldest and which is the youngest. The eldest child is on top and youngest under the second-last one; but actually the number in flash's memory starts from
0(zero), so we have
12 children from 0 - 11; in this function what we are doing is counting all of the children and -1 one from them to take the movie clip which is being rolled over to the top-position or make him the eldest child so that it doesn't get hidden under other clips when it zooms in.
Roll Out Function
Ok now's the time to send back image to it's original position when the mouse roll out event occurs :)
function rollOutMC1 (event:MouseEvent):void {
img_01_mc.gotoAndPlay(16);
}
So, this explains it; very simple, when mouse rolls out it plays the frame sixteen from where the motion tween starts going back to normal and again goes and stops at frame one. Now's the time to create functions for all other remaining movie clips. Please remember that all function names should be different; there should be no same function names, I am pasting the code below for further understanding, when done with all 12 functions and event listeners, our movie works. I'll upload source FLA file for which the link will be given on top of this post :) soon.
// Enable Button Mode for Thumbnail Movie Clips
img_01_mc.buttonMode = true;
img_02_mc.buttonMode = true;
img_03_mc.buttonMode = true;
img_04_mc.buttonMode = true;
img_05_mc.buttonMode = true;
img_06_mc.buttonMode = true;
img_07_mc.buttonMode = true;
img_08_mc.buttonMode = true;
img_09_mc.buttonMode = true;
img_10_mc.buttonMode = true;
img_11_mc.buttonMode = true;
img_12_mc.buttonMode = true;
// Image 01
img_01_mc.addEventListener(MouseEvent.ROLL_OVER, rollOverMC1);
img_01_mc.addEventListener(MouseEvent.ROLL_OUT, rollOutMC1);
function rollOverMC1 (event:MouseEvent):void {
img_01_mc.gotoAndPlay(2);
setChildIndex(img_01_mc, numChildren-1);
}
function rollOutMC1 (event:MouseEvent):void {
img_01_mc.gotoAndPlay(16);
}
// Image 02
img_02_mc.addEventListener(MouseEvent.ROLL_OVER, rollOverMC2);
img_02_mc.addEventListener(MouseEvent.ROLL_OUT, rollOutMC2);
function rollOverMC2 (event:MouseEvent):void {
img_02_mc.gotoAndPlay(2);
setChildIndex(img_02_mc, numChildren-1);
}
function rollOutMC2 (event:MouseEvent):void {
img_02_mc.gotoAndPlay(16);
}
// Image 03
img_03_mc.addEventListener(MouseEvent.ROLL_OVER, rollOverMC3);
img_03_mc.addEventListener(MouseEvent.ROLL_OUT, rollOutMC3);
function rollOverMC3 (event:MouseEvent):void {
img_03_mc.gotoAndPlay(2);
setChildIndex(img_03_mc, numChildren-1);
}
function rollOutMC3 (event:MouseEvent):void {
img_03_mc.gotoAndPlay(16);
}
// Image 03
img_04_mc.addEventListener(MouseEvent.ROLL_OVER, rollOverMC4);
img_04_mc.addEventListener(MouseEvent.ROLL_OUT, rollOutMC4);
function rollOverMC4 (event:MouseEvent):void {
img_04_mc.gotoAndPlay(2);
setChildIndex(img_04_mc, numChildren-1);
}
function rollOutMC4 (event:MouseEvent):void {
img_04_mc.gotoAndPlay(16);
}
// Image 05
img_05_mc.addEventListener(MouseEvent.ROLL_OVER, rollOverMC5);
img_05_mc.addEventListener(MouseEvent.ROLL_OUT, rollOutMC5);
function rollOverMC5 (event:MouseEvent):void {
img_05_mc.gotoAndPlay(2);
setChildIndex(img_05_mc, numChildren-1);
}
function rollOutMC5 (event:MouseEvent):void {
img_05_mc.gotoAndPlay(16);
}
// Image 06
img_06_mc.addEventListener(MouseEvent.ROLL_OVER, rollOverMC6);
img_06_mc.addEventListener(MouseEvent.ROLL_OUT, rollOutMC6);
function rollOverMC6 (event:MouseEvent):void {
img_06_mc.gotoAndPlay(2);
setChildIndex(img_06_mc, numChildren-1);
}
function rollOutMC6 (event:MouseEvent):void {
img_06_mc.gotoAndPlay(16);
}
// Image 07
img_07_mc.addEventListener(MouseEvent.ROLL_OVER, rollOverMC7);
img_07_mc.addEventListener(MouseEvent.ROLL_OUT, rollOutMC7);
function rollOverMC7 (event:MouseEvent):void {
img_07_mc.gotoAndPlay(2);
setChildIndex(img_07_mc, numChildren-1);
}
function rollOutMC7 (event:MouseEvent):void {
img_07_mc.gotoAndPlay(16);
}
// Image 08
img_08_mc.addEventListener(MouseEvent.ROLL_OVER, rollOverMC8);
img_08_mc.addEventListener(MouseEvent.ROLL_OUT, rollOutMC8);
function rollOverMC8 (event:MouseEvent):void {
img_08_mc.gotoAndPlay(2);
setChildIndex(img_08_mc, numChildren-1);
}
function rollOutMC8 (event:MouseEvent):void {
img_08_mc.gotoAndPlay(16);
}
// Image 09
img_09_mc.addEventListener(MouseEvent.ROLL_OVER, rollOverMC9);
img_09_mc.addEventListener(MouseEvent.ROLL_OUT, rollOutMC9);
function rollOverMC9 (event:MouseEvent):void {
img_09_mc.gotoAndPlay(2);
setChildIndex(img_09_mc, numChildren-1);
}
function rollOutMC9 (event:MouseEvent):void {
img_09_mc.gotoAndPlay(16);
}
// Image 10
img_10_mc.addEventListener(MouseEvent.ROLL_OVER, rollOverMC10);
img_10_mc.addEventListener(MouseEvent.ROLL_OUT, rollOutMC10);
function rollOverMC10 (event:MouseEvent):void {
img_10_mc.gotoAndPlay(2);
setChildIndex(img_10_mc, numChildren-1);
}
function rollOutMC10 (event:MouseEvent):void {
img_10_mc.gotoAndPlay(16);
}
// Image 11
img_11_mc.addEventListener(MouseEvent.ROLL_OVER, rollOverMC11);
img_11_mc.addEventListener(MouseEvent.ROLL_OUT, rollOutMC11);
function rollOverMC11 (event:MouseEvent):void {
img_11_mc.gotoAndPlay(2);
setChildIndex(img_11_mc, numChildren-1);
}
function rollOutMC11 (event:MouseEvent):void {
img_11_mc.gotoAndPlay(16);
}
// Image 12
img_12_mc.addEventListener(MouseEvent.ROLL_OVER, rollOverMC12);
img_12_mc.addEventListener(MouseEvent.ROLL_OUT, rollOutMC12);
function rollOverMC12 (event:MouseEvent):void {
img_12_mc.gotoAndPlay(2);
setChildIndex(img_12_mc, numChildren-1);
}
function rollOutMC12 (event:MouseEvent):void {
img_12_mc.gotoAndPlay(16);
}
//-------- End of Tutorial; I'll be adding anything I find necessary time to time; if you find a problem in the article or functionality, please do not hesitate to write it in the comments; i'll be following as soon as I can.
Last Updated: Apr 13, 2011.
Thanks
Iqtidar Ali
www.souldesigns.net