I am comfortable with Cinema 4D for a number of reasons, but this does not mean you cannot utilize another program for creating 3D. Other programs can provide excellent results as well. I recommend looking into higher end packages such as 3D Studio Max, or Rhino3D if you are on a budget.
Step 1. Basic Shapes
I usually begin by creating a few basic shapes and structures, applying some textures to those shapes, and then duplicating the set of shapes a few times to get an interesting form of some sort. In this particular example, I created a cylinder with some intersecting cubes, and duplicated it 3 times to get a sort of tube-like structure that will be the focus of the piece. I group these elements together so that I can continue creating a long tube in very short order. Everything we do from here on in will be based around this structure, so I try and finalize my textures and get this looking the way I want before I go any further. I typically modify my texture properties to have them reflect a bit, as this produces some interesting results in the final render.

Step 2. Camera Properties
With my basic structure built, I copy it onto the stage a few more times and place them in such a way to create a long tube stretching off into the distance. Now, without an interesting perspective of this structure, it tends to look flat and uninteresting. To give our view a more dramatic angle, I create a new Camera object and modify it's properties to give me a focal length of "10". This creates a more powerful perspective that one might expect from a wide angle lens on a camera. You can also play with "aperture width" and "field of view" to get different results.

Step 3. Deformations
Deformations are powerful modifiers built into most 3D programs, that serve as a way to distort or modify space or objects within your 3D environment. In this instance, I will add a "twist" deformer to my group of objects and modify it's properties to essentially twist my tube in space. I can modify the coordinates and size of the "twist" deformer to produce radically different results.

Step 4. Lighting
Here I will add some basic textured cylinders to my grouped object and see how they are effected by the "twist" deformer. I go back and modify values until I get sweeping tubes that come right at the field of view, creating a dramatic foreground energy. Once I have my shapes in place, I want to add some light to the scene to give it some life. I begin by creating a simple light object. This gives some new visibility to the scene, and produces interesting shadows depending on where the light is placed in relationship to my structures. To spice things up a bit, I modify my light object to show "visible light". This causes the light to actually illuminate the space itself, rather than just effect the visibility of my shapes.

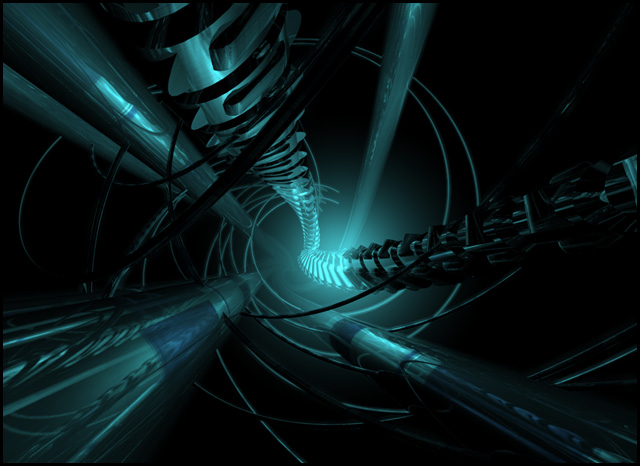
Step 5. Render
With everything in place, I render out a flat .TIF file at my desired dimensions (in this case 1024x768). As you can see below we have a very interesting render to work with. We have some dramatic perspective, some nice reflections, and some interesting lighting effects. The color is a bit more blue than I wanted, but I can always modify the hues in Photoshop to more accurately achieve the greens I desire for this piece.

Step 5. Additional 3D Elements
Before going into Photoshop, I want to have alot of assets to work with, as this will allow me more freedom with my image. To account for this, I will render out some additional pieces I think I will need for Photoshop. First, I render out a new version of my current 3D view with an alpha channel and no lighting effects. (Seen below)

Another thing I like to do, is to create a second camera in my Cinema 4D scene, and render out an entirely different angle. This will give me some extra assets to play with in Photoshop. (Seen below)
Step 6. Photoshop
Once I get into Photoshop, I combine my two 3D renders and move them around until I've created an interesting looking composite.

Step 7. Tweaking color and Shadows
Everything is starting to look nicer, but before I go any further I modify the hues of my renders to appear more green than blue. This is achieved in Photoshop by using "Image > Adjustments > Hue & Saturation". Additionally, I use my brush tool to darken some of the outer areas of the composition. This focuses the eye on what is happening in the middle of the piece. For some added effect, I brush a few white gradient circles over select areas and change their blending mode to "overlay", this saturates the layers underneath to give the illusion of illuminated hotspots.

Step 8. Detail
Finally, I add some horizontal lines to one half of the image, in order to balance out the weight of the image. Then, I add a title, some extra text details and "Conduit" is born.
 Thanks so much for taking the time to read through the tutorial, and I hope it has helped you out in some way.
-Eric Jordan
-2advanced Studios
No comments:
Post a Comment
Please post your thoughts :)