 Hi. everyone designer / developer out there... how are you people? I am posting the first tutorial on Flash. I will try to make it as easier & simple as I can. OK, now to the real stuff.
Category: Adobe Flash CS4 / CS5, ActionScript 3.0 / AS3
Skill Level: Novice to Beginner
Live Demo Link: http://www.souldesigns.net/tutorials/flash_gallery/
Source Files(FLA & SWF): http://hotfile.com/dl/123691859/4824f09/gallery_rollovers.zip.html (updated download link)
Author: Iqtidar Ali @ Soul Designs
Last Updated: Mar 15, 2012.
Summary:
Please take a look at above link first to get the idea of what we are going to achieve with this tutorial. I am going to take an approach that's going to take care of the details and where-ever I feel reasoning, I will give links to resources which elaborate why we are using a specific technique.
Flash designers should now face the facts that we have to get used to Action Script now... because you cannot ignore it... we have to learn it to at least to a level that will make our lives easier, and believe me it's not that difficult.
Step 1: What you need?
#1: Flash Cs4 or CS5
#2: A bunch of Images that fit your design.
Step 2: Creating New Flash File
Now it's time to get it going. First of all open Adobe Flash and goto "File -> New" it'll display a dialogue-box with severl options to start with; we are going to work with the default option "ActionScript 3.0" which is recommended if you are going to publish your flash work for your website. ActionScript 2.0 is not recommended as it is now quite old and not upto the standards of OOP (Object Oriented Programming).
Adjusting Document Properties
When Flash creates a new document it applies the default dimensions to the newly created document, most of the time we need to change the dimensions to our requirements. In this tutorial I am using a document of Widht = 850 x Hieght = 450 Pixels. We can change these settings by pressing "CTRL + J" or going to "Modify -> Document" in the top-menu.
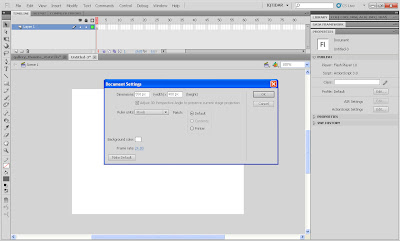 Screen 2-0. Click or Right-click on image for high-res shot or righ-click open in new tab to download.
Step 3: Importing Images to stage.
Now we are in our new flash document and you need to remember to save it :) , it's time to import our images... so keep on the main stage and press "CTRL + R" or goto "File -> Import -> Import to Stage" See Screen 3-0.
 Screen 3-0. Click or Right-click on image for high-res shot or righ-click open in new tab to download.
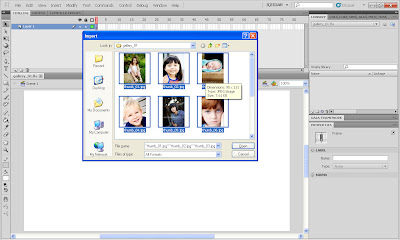 Screen 3-1. Click or Right-click on image for high-res shot or righ-click open in new tab to download.
Converting to Symbol (Movie Clip)
when all our images are imported to stage and are on a single frame. We need to select them all either by Click(Mouse Down)+Drag just like we draw a rectagle but just with the ' Selection Tool (Shortcut "V") ' or Pressing "CTRL+A (select all)" and goto "Modify -> Convert to Symbol" or press "F8" on the keyboard, now a dialogue box will appear, select MovieClip as your type and other details of this box are discussed in Screen 3-3 below;
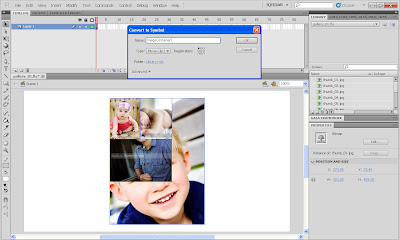 Screen 3-2. Click or Right-click on image for high-res shot or righ-click open in new tab to download.
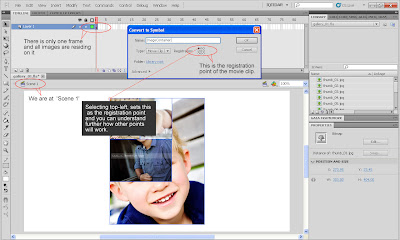 Screen 3-3. Click or Right-click on image for high-res shot or righ-click open in new tab to download.
Now press OK to finish the process of converting our stack of images to a movie clip. Now we need to 'Double Click' on the movie clip to enter inside it or to edit it.
Step 4: Setting up movie Clip:
Now that we are inside the Movie Clip, which we have named "ImageContainer" you can name it anything you like, we will be arranging our images so that we can work with them further.
Guides:
In this example we will use Guides to properly arrange our images, so, what are guides? Guides are imaginary margins you can draw on your screen to help you easily align your objects, set animation starting points and much more. For enabling guides you first need to make sure the Rulers on your page are visible, for this goto "View -> Rulers (CTRL+ALT+Shift+R)" and when you click on the ruler and drag out, the guide margins will appear and you can drag them anywhere on the stage where you want your objects to aligned to them. These lines will not be exported and will not be visible in your .swf , they're just for work in our source .fla files. See example Screen 4-0
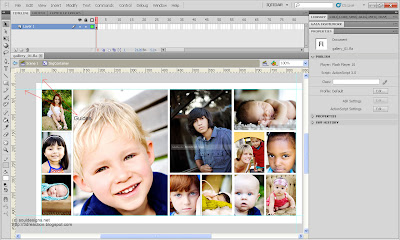 Screen 4-0. Click or Right-click on image for high-res shot or righ-click open in new tab to download.
Converting Images to Individual Movie Clips
Now we are going to convert every image to an individual Movie Clip, for this we need to select every image press "F8" and select Movie Clip as the option in dialogue box and do it to all the movie clips in our "ImageContainer" Movie Clip.
Giving "Instance Names" to every Movie Clip
In AS3 if you want to interact to a Display Object you need to give it an Instance Name for sure. For this we need to select a movie clip, open "Properties" panel if it's not showing already and where it says
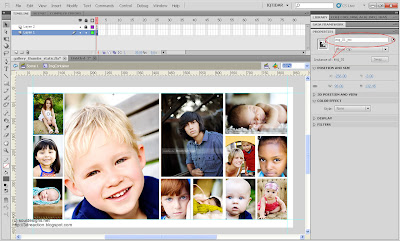 Screen 4-1. Click or Right-click on image for high-res shot or righ-click open in new tab to download.
Step 5: Creating Motion Tween
Now we will create motion tween / animation for each clip.
1- Double Click the first Movie Clip to get inside (edit) the movie clip
2- Select the first frame and insert two new layers (see screen 5-0)
3- Insert frames upto Frame 30 (see screen 5-0)
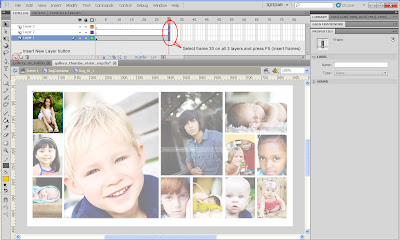 Screen 5-0. Click or Right-click on image for high-res shot or righ-click open in new tab to download.
5- Insert Keyframe( F6 ) on actions layer frame 15
6- Select frame '1' on actions layer and press ( F9 ) to open actions panel and add " stop(); " action and repeat this procedure with frame 15 Keyframe on this layer, so that when the movie starts it rests at the first frame and nothing happens. On Roll-Over state of the mouse we will have the image Zoom-In towards us. We'll do it later when finished with setting up with all the images(movie clips). (see Screen 5-1)
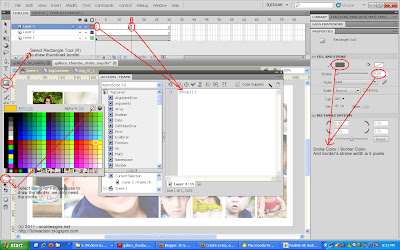 Screen 5-1. Click or Right-click on image for high-res shot or righ-click open in new tab to download.
7- Select Rectangle tool ( R) to draw the border that appears on roll-over, I have selcted a dark grey border, you can use a color of your own choice.
8- Now select first frame on the "border" layer and draw a rectangle of the same size / dimension as of the image and place over our thumbnail image. (see Screen 5-2)
9- Now select frame 15 on both layers (image & border) and " right-click " on your mouse and select " insert classic tween "
10- Again select frame 15 on both layers and Insert Keyframe, Press ( F6 )
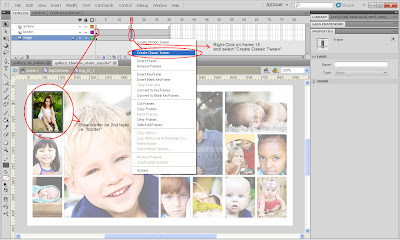 Screen 5-2. Click or Right-click on image for high-res shot or righ-click open in new tab to download.
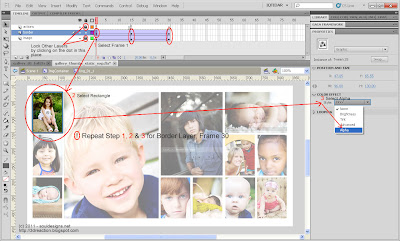 Screen 5-3. Click or Right-click on image for high-res shot or righ-click open in new tab to download.
11- Insert Keyframes on Frame 30 for both layers.
12- Lock actions and image layers. ( See Screen 5-3 )
13- Now select frame 1 on "border" layer and click on the border graphic, goto properties ( CTRL+ F3 if not open) panel and under "COLOR EFFECT" select "Alpha" and use "0" as the value of alpha, which will make the graphic visually disappear (% transparent) on the stage for first frame.
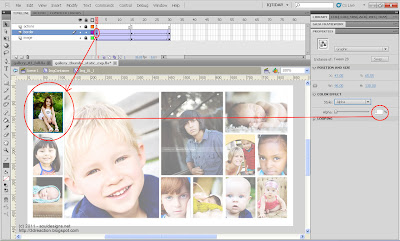 Screen 5-4. Click or Right-click on image for high-res shot or righ-click open in new tab to download.
14- Select frame 1 on both layers and goto Properties Panel and set easing to 100 ( see Screen 5-5 ), easing makes the zoom-in and out effect look smooth. Repeat this step with frame 15 on both layers.
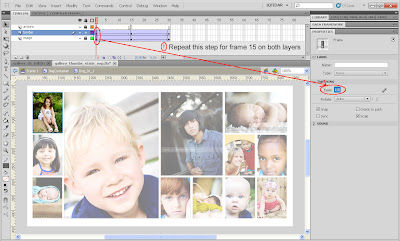 Screen 5-5. Click or Right-click on image for high-res shot or righ-click open in new tab to download.
15- Now on frame 15, we will make both the thumbnail image and the square border increase in size to show a Zoom-In effect. 1st selct frame 15 on the Image layer and increase the width to by 14 pixels, in this example the image's original width is 96 px, so we make the width to 110 pixels, and on the properties bar if you link both Width & Height (see Screen 5-6) the size of the image or object will increase in proportion or we can say the ratio of width and height will be maintained.
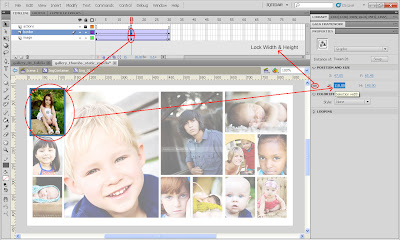 Screen 5-6. Click or Right-click on image for high-res shot or righ-click open in new tab to download.
16- Now you have to repeat this procedure for every Movie Clip on the stage. After that we will move to the part where we will make these Movie Clips respond to the movement of our mouse.
Step 6: Applying ActionScript for Roll-Over effect.
As we know by now that we have created movie clips on the stage and have given them Instance Names i.e. img_01_mc, img_02_mc, so on and so forth. These instance names are like identifiers and are used to communicate with the display objects (Movie Clips, Buttons etc.)
Step by step we will define how to progress towards the goal. All of the actionscript will be put on the Image_Container movie clip's first frame; (see Screen 6-0)
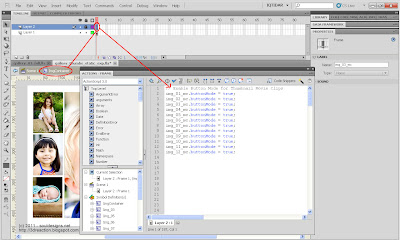 Screen 6-0. Click or Right-click on image for high-res shot or righ-click open in new tab to download.
1- We need our movie clips to respond like buttons, to show hand-cursor on Roll Over and Later on make them click-able.
img_01_mc.buttonMode = true;in this simple line we have given our movie clip instance "img_01_mc" the attribute of a button, now this movie clip will act as a button to the mouse, means when we take our mouse over this movie clip, the hand-cursor will appear like it appears on buttons. We need to add this piece of code for every movie clip in the actions panel. (see Screen 6-0)
2- We are now ready to start our first roll-over;. We need to add an "Event Listener" to the code; an Event Listener in AS 3 is like a radar in my opinion, it just keeps waiting for an event which will or may occur in the lifetime of the movie clip.
img_01_mc.addEventListener(MouseEvent.ROLL_OVER, rollOverMC1);in the above line of code we are adding an Event Listener to our img_01_mc movie clip, this event listener keeps waiting for the event when the mouse rolls over this movie clip / button, and when the mouse comes over this movie clip, it triggers the function called "rollOverMC1"
we also need to add an event Listener when the mouse Rolls Out of the movie clip, because when the mouse rolls out, we want our clip to zoom back or zoom-out back to it's normal position.
img_01_mc.addEventListener(MouseEvent.ROLL_OUT, rollOutMC1);it's the same event listener as above, just the difference is that, it listens to when the mouse rolls out and triggers a different function which is called "rollOutMC1"
Now we will create the functions which will command our movie clip "
function rollOverMC1 (event:MouseEvent):void {ok, now's the time to explain this function; we can see that first this function is triggerd on a MousEvent and it takes our "img_01_mc" to go and play it's 2nd frame, because by default our movie clip is stopped at frame 1 and when mouse rolls over it starts playing from frame 2 and stops at frame 15 because we have put an stop(); function there already, now till when the mouse is over our movie clip it's going to be at frame 15, at this frame if you remember we had made the size of our objects increase, right? so when it moves from frame 2 to 15 we'll get an effect of the image zooming in. and when our mouse rolls out of the movie clip we will trigger another function, but before that we need to explain what setChildIndex means and what it's doing;
img_01_mc.gotoAndPlay(2);
setChildIndex(img_01_mc, numChildren-1);
}
Child Index:
On the main stage we have a mother movie clip named Image_Container, right? whatever name you have given is the main or mother movie clip or you can also call it parent, because it contains several more movie clips in it, which are our Button Movie clips img_01_mc, img_02_mc etc. etc.
The several movie clips inside the parent movie clip are it's children, automatically some clips are over others and some are under others like layers, if we count the number of these movie clips in our case, we have 12 movie clips and flash automatically keeps the record of all of these as the children and creates an index(number counting) to understand which clip is over another or which child is the eldest and which is the youngest. The eldest child is on top and youngest under the second-last one; but actually the number in flash's memory starts from 0(zero), so we have 12 children from 0 - 11; in this function what we are doing is counting all of the children and -1 one from them to take the movie clip which is being rolled over to the top-position or make him the eldest child so that it doesn't get hidden under other clips when it zooms in.
Roll Out Function
Ok now's the time to send back image to it's original position when the mouse roll out event occurs :)
function rollOutMC1 (event:MouseEvent):void {So, this explains it; very simple, when mouse rolls out it plays the frame sixteen from where the motion tween starts going back to normal and again goes and stops at frame one. Now's the time to create functions for all other remaining movie clips. Please remember that all function names should be different; there should be no same function names, I am pasting the code below for further understanding, when done with all 12 functions and event listeners, our movie works. I'll upload source FLA file for which the link will be given on top of this post :) soon.
img_01_mc.gotoAndPlay(16);
}
// Enable Button Mode for Thumbnail Movie Clips//-------- End of Tutorial; I'll be adding anything I find necessary time to time; if you find a problem in the article or functionality, please do not hesitate to write it in the comments; i'll be following as soon as I can.
img_01_mc.buttonMode = true;
img_02_mc.buttonMode = true;
img_03_mc.buttonMode = true;
img_04_mc.buttonMode = true;
img_05_mc.buttonMode = true;
img_06_mc.buttonMode = true;
img_07_mc.buttonMode = true;
img_08_mc.buttonMode = true;
img_09_mc.buttonMode = true;
img_10_mc.buttonMode = true;
img_11_mc.buttonMode = true;
img_12_mc.buttonMode = true;
// Image 01
img_01_mc.addEventListener(MouseEvent.ROLL_OVER, rollOverMC1);
img_01_mc.addEventListener(MouseEvent.ROLL_OUT, rollOutMC1);
function rollOverMC1 (event:MouseEvent):void {
img_01_mc.gotoAndPlay(2);
setChildIndex(img_01_mc, numChildren-1);
}
function rollOutMC1 (event:MouseEvent):void {
img_01_mc.gotoAndPlay(16);
}
// Image 02
img_02_mc.addEventListener(MouseEvent.ROLL_OVER, rollOverMC2);
img_02_mc.addEventListener(MouseEvent.ROLL_OUT, rollOutMC2);
function rollOverMC2 (event:MouseEvent):void {
img_02_mc.gotoAndPlay(2);
setChildIndex(img_02_mc, numChildren-1);
}
function rollOutMC2 (event:MouseEvent):void {
img_02_mc.gotoAndPlay(16);
}
// Image 03
img_03_mc.addEventListener(MouseEvent.ROLL_OVER, rollOverMC3);
img_03_mc.addEventListener(MouseEvent.ROLL_OUT, rollOutMC3);
function rollOverMC3 (event:MouseEvent):void {
img_03_mc.gotoAndPlay(2);
setChildIndex(img_03_mc, numChildren-1);
}
function rollOutMC3 (event:MouseEvent):void {
img_03_mc.gotoAndPlay(16);
}
// Image 03
img_04_mc.addEventListener(MouseEvent.ROLL_OVER, rollOverMC4);
img_04_mc.addEventListener(MouseEvent.ROLL_OUT, rollOutMC4);
function rollOverMC4 (event:MouseEvent):void {
img_04_mc.gotoAndPlay(2);
setChildIndex(img_04_mc, numChildren-1);
}
function rollOutMC4 (event:MouseEvent):void {
img_04_mc.gotoAndPlay(16);
}
// Image 05
img_05_mc.addEventListener(MouseEvent.ROLL_OVER, rollOverMC5);
img_05_mc.addEventListener(MouseEvent.ROLL_OUT, rollOutMC5);
function rollOverMC5 (event:MouseEvent):void {
img_05_mc.gotoAndPlay(2);
setChildIndex(img_05_mc, numChildren-1);
}
function rollOutMC5 (event:MouseEvent):void {
img_05_mc.gotoAndPlay(16);
}
// Image 06
img_06_mc.addEventListener(MouseEvent.ROLL_OVER, rollOverMC6);
img_06_mc.addEventListener(MouseEvent.ROLL_OUT, rollOutMC6);
function rollOverMC6 (event:MouseEvent):void {
img_06_mc.gotoAndPlay(2);
setChildIndex(img_06_mc, numChildren-1);
}
function rollOutMC6 (event:MouseEvent):void {
img_06_mc.gotoAndPlay(16);
}
// Image 07
img_07_mc.addEventListener(MouseEvent.ROLL_OVER, rollOverMC7);
img_07_mc.addEventListener(MouseEvent.ROLL_OUT, rollOutMC7);
function rollOverMC7 (event:MouseEvent):void {
img_07_mc.gotoAndPlay(2);
setChildIndex(img_07_mc, numChildren-1);
}
function rollOutMC7 (event:MouseEvent):void {
img_07_mc.gotoAndPlay(16);
}
// Image 08
img_08_mc.addEventListener(MouseEvent.ROLL_OVER, rollOverMC8);
img_08_mc.addEventListener(MouseEvent.ROLL_OUT, rollOutMC8);
function rollOverMC8 (event:MouseEvent):void {
img_08_mc.gotoAndPlay(2);
setChildIndex(img_08_mc, numChildren-1);
}
function rollOutMC8 (event:MouseEvent):void {
img_08_mc.gotoAndPlay(16);
}
// Image 09
img_09_mc.addEventListener(MouseEvent.ROLL_OVER, rollOverMC9);
img_09_mc.addEventListener(MouseEvent.ROLL_OUT, rollOutMC9);
function rollOverMC9 (event:MouseEvent):void {
img_09_mc.gotoAndPlay(2);
setChildIndex(img_09_mc, numChildren-1);
}
function rollOutMC9 (event:MouseEvent):void {
img_09_mc.gotoAndPlay(16);
}
// Image 10
img_10_mc.addEventListener(MouseEvent.ROLL_OVER, rollOverMC10);
img_10_mc.addEventListener(MouseEvent.ROLL_OUT, rollOutMC10);
function rollOverMC10 (event:MouseEvent):void {
img_10_mc.gotoAndPlay(2);
setChildIndex(img_10_mc, numChildren-1);
}
function rollOutMC10 (event:MouseEvent):void {
img_10_mc.gotoAndPlay(16);
}
// Image 11
img_11_mc.addEventListener(MouseEvent.ROLL_OVER, rollOverMC11);
img_11_mc.addEventListener(MouseEvent.ROLL_OUT, rollOutMC11);
function rollOverMC11 (event:MouseEvent):void {
img_11_mc.gotoAndPlay(2);
setChildIndex(img_11_mc, numChildren-1);
}
function rollOutMC11 (event:MouseEvent):void {
img_11_mc.gotoAndPlay(16);
}
// Image 12
img_12_mc.addEventListener(MouseEvent.ROLL_OVER, rollOverMC12);
img_12_mc.addEventListener(MouseEvent.ROLL_OUT, rollOutMC12);
function rollOverMC12 (event:MouseEvent):void {
img_12_mc.gotoAndPlay(2);
setChildIndex(img_12_mc, numChildren-1);
}
function rollOutMC12 (event:MouseEvent):void {
img_12_mc.gotoAndPlay(16);
}
Last Updated: Apr 13, 2011.
Thanks
Iqtidar Ali
www.souldesigns.net
No comments:
Post a Comment
Please post your thoughts :)